
If you are assembling a dollhouse kit, you may find that this step is listed much further along in the instructions.
Take it from me…trying to attach a door to the door frame with screws that are so tiny they are almost impossible to see, isn’t fun when the entire house is already built.
(Many kits tell you to simply glue the door back into position after painting it but I haven’t met anyone yet who didn’t want to be able to open and close the door.)
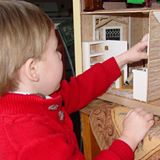
It is MUCH easier to attach the door while the wall that contains the door frame is not attached to anything. (NOTE: You are going to need a tiny Phillips Head screw driver for this step.)
STEP-BY-STEP directions are below, but let’s cover a few important things to know before you begin.
First of all, your door is most likely the type that is going to be “punched out” from the exact space or hole that will become the door opening, itself. It came that way in the package. Which means it is the exact size of the door opening. Which, in turn, means that it is going to have to be sanded REALLY well on ALL sides in order for it to swing freely into and out of that tight door opening once installed without scraping on the floor or getting stuck within the sides of the door opening.
And the addition of the hinges means you need even more of the side edges sanded off to make room for the operation of the hinges.
If this sounds confusing, then just take my experience into account. I usually take a pencil and straight-edge ruler and draw a straight line, on all four sides of the door, about 1/8″ or a bit more, from each door edge. Remember, not only do you need to leave room for door operation, but you are also going to paint the edges of the door later and that little bit of paint does add width and length to the door, itself.
Now, if your kit didn’t include hinges and door knobs (and most kits don’t include this hardware), you will find that specialty suppliers for dollhouses will sell you a complete set for a door for about $7-$10. Since I run a nonprofit that provides dollhouses to abused children, I am always looking for ways to save money so we can serve more children.
So I found that the hardware used on these small wooden boxes (many styles can easily be found at large arts and crafts stores for $1.99) works perfectly and saves money at the same time. The boxes are usually about 2 1/2″ X 4″ or roughly that size…small enough to fit in you open hand. (See pictures below.)


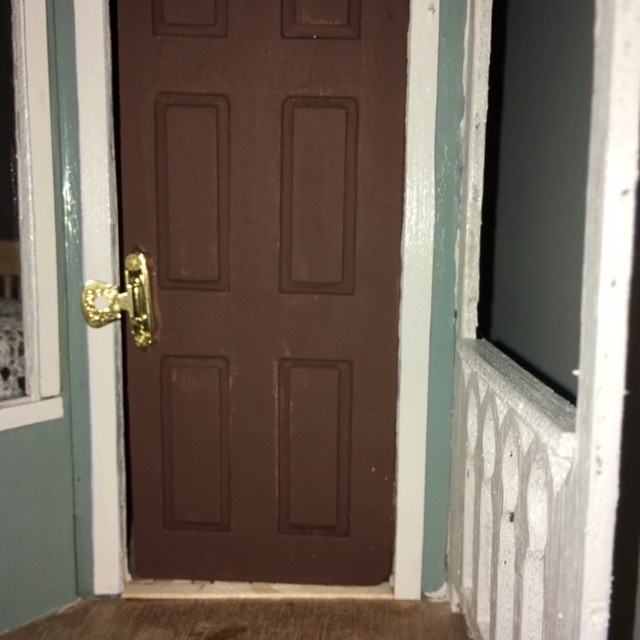
The 2 hinges visible in the middle of the second picture will do nicely when hinging the door to the wall next to the door opening. The tiny clasp that “locks” the box closed has 2 pieces. I like to use the piece at the bottom of the second picture as the interior door knob, while using the other part of the clasp on the exterior of the door to keep the door securely closed. The part of the clasp that is hinged can be placed and attached in such a way that it can be flipped over to cover the door frame, keeping the door closed. (See pictures below.)


So, in this order, I:
- Sand down the edges of the door and paint the exterior side, the interior side, and the edges with the colors I have selected. Allow the paint to dry. Hold the door inside the door opening and check to be sure you have at least 1/8″ clearance on all four sides.
- While holding the door in place in the opening of the wall (high enough off the floor so that the door won’t scrape the floor when being opened and closed), decide where you want to place your hinges on the interior of the door in the house, taking note that the holes for the screws in the hinges must reach onto solid wood- both on the door and on the wall once the hinges are screwed in place. (The door needs to be close enough to the “receiving wall” so that the hinge holes’ placement will allow the hinges to be attached to both the door and the “receiving wall”.)
- Position the first hinge in the correct place on the DOOR with your finger and, while holding the hinge in place securely, place both the door and the hinge gently onto a flat surface and mark, with a pencil, the exact place for the hinge screws by putting the point of the pencil down through the screw holes. I like to make tiny pilot holes for the screws with a thumb tack where the pencil marks are at this point.
- Screw the hinge onto the door. (NOTE: Since doors tend to get a lot of use, I like to dip the pointed tip of the tiny screw into a dab of wood glue before screwing into place for added strength later.) Repeat this process for the second hinge as you attach it to the DOOR.
- Now hold the door in place in the door opening of the wall, placing the unattached sides of the hinges on the “receiving wall” in a position that will allow the door to swing freely open and closed. (Remember to allow clearance at the floor level so the bottom of the door doesn’t scrape the floor when it moves open and closed.) With your pencil, mark through the screw holes on the 2 hinges so that you have marked their correct positions on the “receiving wall”. Use a thumb tack to make pilot holes for the screws.
- Screw the hinges onto the WALL. (NOTE: Since doors tend to get a lot of use, I like to dip the pointed tip of the tiny screw into a dab of wood glue before screwing into place for added strength later.) Repeat this process for the second hinge as you attach it to the WALL.
- Screw the “door knob” portion of the box clasp to the interior side of the door, at your selected “door knob height”, using the same attachment methods you have been using for the hinges.
- Attach the other portion of the box clasp to the exterior door, making sure that the section the is hinged will lay flush across the door frame (once installed.) Refer back to picture above if needed.
- Finally, the door frame trim pieces can be located in the kit, punched out, sanded and painted. When the paint is dry, use wood glue to attach the trim pieces, both interior and exterior, to the frame of the door. The interior frame piece on the side of the door with the hinges will cover the hinges on the wall nicely.
Congratulations! You have a functioning door! (Note: Save the leftover wooden box pieces from which we took the hardware. Later in this series, I will show you how you can use them to make a nice furniture piece.)
Copyright 2017
